 |
| figure 1 |
At the last minute, Rich Turnbull, my usual co-conspirator and fellow chemigram artist, couldn't make it - they needed him at the Metropolitan Museum to lecture on some bizarre topic that he's expert on, or soon would be if you gave him an hour or so with Wikipedia. Rich is their back-up academic star and they know it, which, if I were less diplomatic, I would call star abuse. So I had no choice but to turn to Eva Nikolova to fill in for him and what an unexpected surprise that turned out to be, though I'd had inklings of what was going to happen: I'd seen her work in shows around town for several years, her scarred depictions of ruined dream cities made of the most chaste of materials, and had become a big fan. What I hadn't counted on was how ready she was to communicate her secret processes to the New York public, for that was to come.
In our little chemigram community, Eva is known for introducing strange new products into the process such as guava paste, marshmellow fluff, peanut butter, lipstick - the list goes crazily on. If you divide chemigram resists into hard and soft depending on the length of time it takes them to loosen their hold on the photographic paper, the items in Eva's toolbox are all soft resists, which can be used separately or together with 'traditional' soft resists like PVA glue (Elmer's glue) or Karo syrup. Some are displayed in figure 2, waiting for students to overcome their uncertainty and try them. Most definitely, Eva is not a purist.
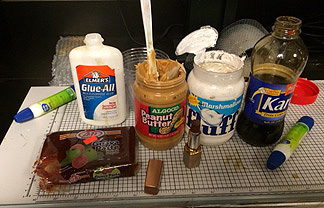 |
| figure 2 |
 |
| figure 3 |
 |
| figure 4 |
Here's one that's as rich in depth as you could want, done with what appears to be a combination of guava paste and peanut butter - correct me, readers, if I've got this wrong. Any lipstick?
 |
| figure 5 |
There's more. Figure 6 (fig. 1 and 3 as well) shows the rich dark reds obtainable from certain vintage papers, dating from those golden days before papers got their cadmium reformulated away (see our post on this here), not to speak of other mystery substances. Taking a page from Alison's notebook, Eva thoughtfully provided us with a bounty of gifts: Kodabromide E4 SW expired 1941, Kodabromide F-1 Glossy DW expired 1967 ("dreamy blues, lavenders, silvery greys" says Eva), Dupont Defender Grade 3 DW expired 1951, and Ilford MG 26K FB Velvet Stipple DW expired 1962. It makes my eyes misty to think about it. My contribution was the comparatively prosaic Adorama FB Glossy and Fomatone FB Matt, with odd leftovers of Ilford thrown in.
 |
| figure 6 |
In figure 7,
note the canny use of the remaining hard resist (Golden MSA varnish) as
design element on a piece of Ilford FB paper. Most would have
continued until all the resist had lifted - I might have too - but not
this artist. A nice call indeed.
 |
| figure 7 |
Figure 8, below, shows what can be done with PVA glue if the snatch point is carefully calculated - by intuition of course. If snatch point isn't already a keyword in this blog, let's make it one. That's the moment, usually quite early in the tray dance if you're using soft resists, when you snatch the paper out of one chemical very quickly and thrust it into another, in order to suddenly arrest the action. A matter of seconds can make all the difference. In the lower part of the picture observe the white skid marks from the hydrodynamics of a sudden thrust into developer from a fixer launch.
 |
| figure 8 |
We can learn something from each image we present - each has a tale to tell. For now, pay particular attention to figure 9, where two thickly slathered arrays of Eva's resists have received the same chemical attacks.
 |
| figure 9 |
In one peanut-butter is the main actor, in the other it's lipstick. Here's a detail of the upper part:
 |
| figure 9, detail |
Let's look at more work, picking them almost at random. Here's a soft-resist I like.
 |
| figure 10 |
And another, with hybrid marks drawn from different traditions.
 |
| figure 11 |
Sometimes, the softest marks are those that stay with you the longest.
 |
| figure 12 |
Participants included Mary Alestra, Michelle Bratsafolis, Carol Chu, Sarah Davis, Mira Dayal, Nadezhda Neusypina, and Kiera Wood. Hats off to all!
* * *
For those interested, Rich Turnbull is doing a chemigram workshop on November 21 at the Penumbra Foundation, just 8 blocks south of here in midtown Manhattan.
International Center of Photography
www.icp.org
Eva Nikolova
www.evanikolova.com
Penumbra Foundation
www.penumbrafoundation.org
Douglas Collins


It’s a joy to share the classroom with one’s former teacher, and a joy to work with a spirited and adventurous group which as the results above testify, were completely undaunted by all the sticky, greasy goop we threw their way. I’m always happy to share my discoveries and hope that others will make them their own – that’s the chemigram tradition passed down to me and many others by Doug, which strives to enlarge our community, so that we can have a dialogue about chemigrams that moves beyond their exoticism.
ReplyDeleteFigure 12, in my opinion, is as sweet an image as you could want. I admire the curiosity and courage of these participants, trying things, unafraid of what may happen. It seems that is the secret to success in this process.
ReplyDeleteBeautiful images and beautiful writing, as always...
ReplyDeleteBravo to Eva for her very eclectic workshop. If I may be allowed a remark, I find it regrettable that in these workshops one might come away thinking the most important parameter in a chemigram is the choice of resist. Here, we see before us a table with gels, peanut butter, glue, lipstick, etc. It's fun, but it seems to me the most important parameters are the basic ideas of thickness, dilution, duration, temperature and so forth. In other words more Malevich, less Pollock. Figure 7 shows what I mean: we needn't wait until all the resist detaches. This chemigram breathes. Ditto for figures 4 and 8.
ReplyDeletePierre you old coot, you've skewered our wonderful and productive obsession with resists; it's a long-overdue corrective and you're probably right. There's nothing left now but to return to the basic modulations of darkroom practice.
DeleteStill, we don't want completely to throw out the baby with the bathwater. It must be acknowledged and accepted that a lot has been gained in recent years, in this making of chemigrams to which we all are committed, by exploiting the varying effects of resist, paper, developer chemistry, toner, even the chemistry of chromoskedasia, even, in an arte povera sense, abrasion of the emulsion. Key aspects of this are contained in Eva's process. We're thankful for her innovations.
Pierre is absolutely right that ideas of thickness, dilution, duration, temperature and so forth are crucial, and we do indeed always present them as such to students. Choice of resist is only one among a myriad of others available to the artist - no more nor less important, as it's one's intent that determines which set of variables one chooses to manipulate. No parameter is exclusive of others but yes, things can get complicated, and the option of going back to basics is always a good one. The practice of incorporating a variety of substances as resists in these beginner workshops serves to introduce the novice to the very concept of a resist as something, anything that has suitable properties, rather than as an item on a shortlist of prescribed materials. It encourages a mindset of openness and experimentation and yes, it is indeed fun - never to be underestimated when teaching.
DeleteAnother excellent piece of writing, making these wonderful processes even more engaging. Images 4 and 7 are my definite favourites!
ReplyDeleteI'm recusing myself Mike, in this wealth of invention. With you and Pierre both weighing in, it looks like 4 and 7 are the winners!
ReplyDeleteWho am I to add to the masters of the chemigram, but I had two thoughts: I think it may be fun practice for a student to stick with one resist during a session to understand the multiple effects of time, temperature, thickness, duration, because all of these are important. However, the choice of resist influences those effects and is interdependent in my limited experience—think oil vs hummus. Oil produces an instant chemigram whereas hummus takes more time to disintegrate.
ReplyDeleteTwo, I think space is an important one in a chemigram, to not fill up every inch with pattern or design or even color. It is easy for a beginning chemigrammist to have horror vacui; developing the sense of when enough is enough comes with much practice. However, when I have chosen not to peel off the resist, but leave some of the hard resist on the paper, even with a final fix it has eventually turned gray underneath, so either the eventual morphing of color should be taken into account, or the fixing has to be carried out way longer and stronger than normal to get through the paper base to the resist covered emulsion.
When I teach a 5-6 week chemigram class I do exactly as you suggest – limit the options for each session so that there is more time to explore the fundamentals Pierre reminds us of, as well as the unique properties of various resists themselves (permeability, solubility, granularity, etc, etc.) and their interaction with the those foundational parameters. However in these short, intense workshops like the one at ICP that Doug was kind enough to invite me to, where students have no more than 6 hours of work time in which to go from never having heard of a chemigram to tackling the choices that any artist grapples with, I believe the horror vaccui often evident in beginners’ works has more to do with trying out options against a fast-ticking clock rather than an aesthetic direction.
Delete5-6 weeks would be a wonderful luxury. When I share the process I have a "gang lab" session of 3 hours after a 3-hr lecture the same week. Since 4 prints are due for the assignment, it encourages quick work, and soft resists are just that, with a tendency towards horror vacui.
ReplyDeleteI have thought of extending a process longer to encourage more virtuosity, but at least two of my 15 students are doing chemigrams for their final project (8-10 prints due Dec 11) and I am excited to see what they discover.
The next step is to REALLY commit, and that takes years. I remember making that commitment to gum in graduate school. For two years that's what I did (some mordançage, too) and that's when I really understood it. I hope to do this soon with the chemigram now that I have finished writing the Focal Press gum book...writing always takes time away from doing. BTW my favorite is Figure 1.
For my chemigram workshops in Virginia City, NV, I focus mostly on the three different paper types – silver bromide, silver chloride and silver chlorobromide. Each paper surface, age and chemical makeup contribute to entirely different visual effects. Resists are secondary and I offer the student a range of about ten to explore for during and after the workshop. I provide everything, including a packet of 15 different papers marked on the back with a symbol to identify the type of paper, i.e. (O) for Oriental. Surface is identified with J, G, R, N and so on. The third, and perhaps the most imaginative, is the method of application of each particular resist. Close observation of the different variables add to the database, with careful note taking the results from each workshop can then be passed on to the next. I cover lumens (to show how chemigrams can be used with another process); direct chemistry; soft resists; hard resists (I prepare most hard resists for the student outdoors with a respirator); and wet hard resists are demonstrated near a window of our very well ventilated large studio. We also discuss possible combinations with other antique photo processes.
ReplyDeleteOh, thank you Eva for devoting time to teaching chemigrams.
ReplyDeleteDoug, Rich, Christina and all those out there who are passing on what they know, thanks to you also.
I particularly like Figure 7. Deconstructing the grid is an interesting statement, I would like to see more.